|
|
EPISODE #86 -
SATURDAY AUGUST 13, 2011
Cool! And I’m not
talking about how outstanding something is… I’m talking about
the weather. Ron, the editor of the Fusion show, told me the
other morning that his furnace kicked on! This is crazy! I guess
that means we should start looking at the insulation in the
attic.
Now
You’re Cooking – Wood-Fired Pizza – Street of Dreams
Our ‘Now you’re Cooking’ segment is
coming to us from the NW Natural Street of Dreams. This once a
year celebration is a great place to see the latest and greatest
in homes and new construction. Now, you may be wondering how NW
Natural can be involved in a ‘woodfired’ pizza. This oven has a
small gas fired starter so you can get your oven up and running
faster and that means a more consistent cooking temperature.
Chef Andy Arndt from Aquariva has lots of experience with this
type of cooking and he prefers it to other types of grilling and
cooking because once the temperatures are reached then they cook
more evenly and for a longer time. Aquariva is located at John’s
Landing and has a great view of the river in addition to the
great food. To partner with the pizza he was also grilling
vegetables with a FireMagic grill. To prepare the veggies he had
Jenna drizzle them with olive oil, salt and pepper. These were
grilled on a medium heat so they would be finished at the same
time as the pizza. While the veggies were grilling, Chef Andy
spread out the pizza dough, which was a 2-3 ounce ball of dough.
He rolled them thin so they would have a nice and crispy crust
when finished, which is perfect for this type of oven. Once the
dough was done it was coated with a marinara sauce that they
make at the restaurant, but you can use a pre-made sauce if you
want. He also brought a white cream sauce as well. You can get
really creative with the sauces and toppings if you want. Some
of the toppings included shallots, buffalo mozzarella,
prosciutto, some New Moon cheddar cheese and even some basil.
Once the pizzas were made they went into the oven and after a
few minutes everything was ready! If you would like to see this
great oven and outdoor entertainment area you can check out the
Brentwood Homes ‘con Amore’ home through the end of August. Go
to
www.streetofdreamspdx.com for more info and directions.
Space Saving Kitchen Gadgets
No one likes to waste space. And in
the kitchen, wasted space is a real problem. There are all those
‘must have’ cooking utensils that make cooking a joy, but they
always seem to take up too much room. We stopped at
Kitchen
Kaboodle (503-643-5491) to see what they had to help save
space (and time) in the kitchen. Maryann joined us again to show
Robin some great space savers, both large and small! The advent
of heat resistant silicone has made some of these gadgets
available. We started with simple steamers. These are designed
to fit into any size pan and they will not melt or overheat.
They are also microwave and dishwasher safe. Next we saw a salad
spinner. This one had two parts that both collapsed to take up
less space. This is great for a small apartment or motor home.
The next few items turned out to be colanders with a twist. One
was a colander that had handles so you can use it in your sink
and then it collapsed to fit under the sink. The next one could
be used to drain vegetables or fruit and then it collapsed to
make a little vegetable storage bin as well. We moved on to see
a funnel, some measuring cups and spoons and even more
strainers. We finally moved to food carriers. These expand to
carry cakes, pies and even eggs and then you can make them small
for storage. We even saw a dish rack that took up little or no
space! If you would like to see many other space saving ideas,
you can stop by any of the 5 Kitchen Kaboodle locations to see
all the great ideas they have for your kitchen.
Garbage Disposal Fix
It always happens… usually at a
dinner party or some other big event. The garbage disposal gets
stuck and it doesn’t work. We stopped by
George
Morlan (503-224-7000) to get some tips for fixing it from
Dave Charvet. He told us the number one reason for the clogs in
the first place… not enough water! You have to be running water
through the unit to make it work at its best. Water first and
then add the garbage (don’t pack it full either). The sound will
also tell you when it is empty. Now if you have a clog the first
thing you need to do is to shut off the power. Not just at the
switch on the wall, but also at the circuit breaker in your
power box. Next try to dislodge the clog from the top. Don’t use
your hand; there are sharp objects in there! Use a broom handle
or the handle from your plunger. A lot of times that will knock
the object loose and it will work again. If you hear a hum that
means that there is power to the unit. If you hear nothing you
may have tripped the circuit breaker on the unit itself. Open
the doors to your cabinet and look under the unit for a red
button. This is the breaker switch and it may need to be reset.
While you are under the unit you may also notice a hole in the
center of the unit. This hole is for an ‘Allen wrench’ or ‘hex
key’. This will allow you to turn the blades from under the unit
and that could help in breaking a clog loose. If any of these
options fail, call a plumber! It is better to have a
professional take care of things than to ruin a dinner party
with a trip to the hospital. For all your plumbing questions you
can do what we do, check with the experts at George Morlan
Plumbing!
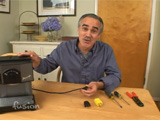
Fixing a Plug
If you have an appliance that
doesn’t seem to be working, before you toss it out, check the
electrical plug. For a lot of our home appliances the plug may
be the problem, and replacing the plug may be an easy chore for
the homeowner. David showed us how easy it is to replace a plug
and get that appliance up and running again. Most of the time
the plug fails because we pull on the cord and not the plug
itself. If the wires become exposed you should cut the plug off
and replace it. The first thing you want to do is check the
appliance to make sure that you know what the power requirements
are for the unit. The appliance that we had required a 15
amp/125 volt plug. There are lots to choose from at the hardware
store so we looked for one that was designated for a small
appliance. As far as tools go, you really only need a couple of
items. You will need a Phillips or flat head screwdriver and a
wire stripper. To replace the plug, go at least 1 inch past the
damaged area on the cord. Cut the old plug off there. Then strip
the cord down about 1 and ½ inches per the instructions on the
plug package (always follow the directions). Your wire will
generally be made up of 2 different wires and the insulation on
one of them could have a silver color on the outside. This
silver color will mean that you will attach that to the silver
terminal on the new plug. The other wire will go on the brass
screw (terminal). Make sure that your wires are secure on the
terminals and that there is no pinching of the wire when you
close the new plug. Test your plug in a GFI circuit to make sure
it works and you should be done. If you have any problems, check
with your local hardware store. Remember you are dealing with
electricity and it should be treated with caution and respect.
Be safe and you will have a working appliance again in no time. |
   
 |
||||||||||
|
Website design and content ©2009-2011 Gustin Creative Group.
Please send website inquiries to
gustingroup@comcast.net. |